Explore 5 Ways to Tie a Wedding Chair Bow or Sash
Looking for ideas on how to tie wedding chair bows? Follow our instructions below to test out these 5 popular knots and bows and see which shape best fits your design and setup requirements.
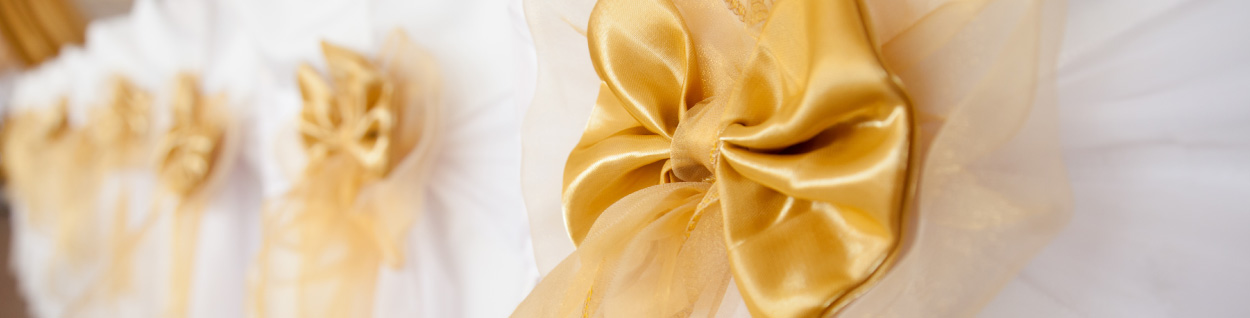
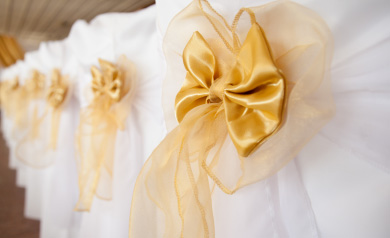
Classic Bow Tie
Since most people are familiar with this classic bow, which you tie the same way you tie shoelaces, many DIY brides and event planners choose this convenient bow tie to add delight and whimsy to their chairs and chair covers. With its easy-to-untie knots, the bow tie facilitates faster setup and breakdown than other knots. And, if you have helpers, teaching them the bow tie is a snap. Choose satin sashes for a draped quality and organza for a lighter, uplifted and sheer quality. Here’s how to tie the classic bow tie:
- Place the sash around the front of the backrest. Make sure your sash is centered and that the ends are even behind the chair.
- Tie a half knot first by crossing the two pieces of the sashes and flipping one under the other and pulling in opposite directions to tighten across the back of the backrest.
- Start to create your second half of this knot by forming a loop with one hand and a loop in the other.
- Tie the loops together by crossing the two loops and threading the front loop behind and under the back loop, pulling the loop through the hole created by the crossing. Pull tight.
- To help the bow shape stay formed, you can flip the direction of the bows and pull the top and bottom edges of each loop away from each other. Then, if you’d like, add a velcro bow cover for extra sparkle.
Flip Tie
We love the flip tie for its modern twist on the classic bow tie. The flip tie sets up in under 30 seconds per chair, and with our handy shortcut, it’s easy to breakdown, too. We recommend the flip tie for our satin sashes only. Since the flip tie requires hiding the smaller hanging sash end behind the longer end, organza’s see-through quality doesn’t work well with this particular knot. But satin looks superb. Here’s how to do the flip tie:
- Place the sash around the front of the backrest. Make sure your sash is centered and that the ends are even behind the chair.
- Tie a half knot first by crossing the two pieces of the sashes and flipping one under the other and pulling in opposite directions to tighten.
- Start to make the bow tie but instead of two loops, form one loop in one hand. Take the long sash piece in your other hand and wrap it in front and then around behind the loop, then pull the end through the hole created by the wrapped piece, and tighten. This creates, in effect, a single loop bow tie. The loop tie instead of knot will make it easier to breakdown the sashes. And, since the loop will be hidden underneath fabric, you don’t have to worry about it looking immaculate.
- Next, adjust the hanging sash ends so that the longer flap is in front. Then pull both sash ends up under the knot and over so it hides the knot.
- Flip the ends up and over as many times as you’d like for the desired length.
- You may need to steam satin prior to the big day to make sure the sash does not have folds in it. See our care guide for more information.
Side Bow Tie
The side bow is the bow tie placed on the side instead of centered. This variation fits well for more modern wedding design themes. You can add flowers to dress up the bows, too, or add a velcro bow cover for extra sparkle. To accomplish this look, simply start by placing the center of the sash on the side of the backrest and making sure the ends are even lengths in front of you. Then tie the classic bow (see instructions above). You can also make a bow with shorter hanging ends by wrapping the sash around the backrest twice instead of once (see the double wrap bow tie below).
The Rosette
Wedding planners recommend using the rosette for smaller weddings (think under 50 people), where you can afford to spend more time per chair. This knot takes some time to achieve perfection. It also takes longer to break down because every knot you make takes time to untie and this one has three! If you’re willing to put in the work, however, you’ll pull off a gorgeous look with either our organza or satin sashes. Here’s how to master the rosette.
- Place the sash around the front of the backrest. Make sure your sash is centered and that the ends are even behind the chair.
- Tie a half knot first by crossing the two pieces of the sashes and flipping one under the other and pulling in opposite directions to tighten. Then repeat the process to form a knot.
- Take the two ends and cross them over each other and pull tight, then repeat again and again, forming a two-strand twist effect, continuing three-quarters down the length of the sash ends.
- Tie a knot there and keep the twist tight.
- Then twist the two-strand braid counterclockwise until it begins to buckle on itself. As it does, follow the natural bends and begin to wrap the material around the knot on the backrest to form the rosette.
- When you get to the end, tie it off and allow the extra material to hang down.
Double Wrap Knot
The double wrap knot is a variation of the classic bow tie with an extra wrap around the backrest. It gives more interest to the chair with the crossed sash in front and a larger swatch of color. It’s also a great solution for satin bows. With less material at the end to tie the bow, the bow loops tend to retain their shape. To create this knot:
- Unlike the other knots, start by placing the center of the sash around the low back of the backrest first at around 3” from the seat of the chair.
- In front, cross the sashes and pull around to the back of the back rest forming diagonal crossed sashes in front. Instead of tying your knot over the low piece of sash, tie your knot higher up on the backrest to give it variation.
- Tie your classic bow tie. Then, if you’d like, add a velcro bow cover for extra sparkle.
We recommend buying a few sashes first to try out the variations before committing to a material, color, or knot. It may look easy when watching others demonstrate the steps or in the instructions and pictures above, but even the classic bow can take time to set up to your liking. And you’ll have to multiply the time it takes to do one by the amount of chairs you’ll need to set up. A short 30 seconds can add up for over 100 or 150 seats.
|
Recommended Material |
Easy Set Up (under 30 second/chair) |
Easy Breakdown |
Unique Look |
| Flip Tie |
Satin |
√ |
√ |
√ |
| Double Wrap Knot |
Both |
√ |
√ |
√ |
| Side Bow Tie |
Both |
√ |
√ |
√ |
| Classic Bow Tie |
Organza |
√ |
√ |
|
| Rosette |
Both |
|
|
√ |